


POS Terminal External Secondary Display Guide for Setup and Selection
Understanding Display Types: VFD vs. LCD Multimedia Screens
When we configure a Dual Screen POS System for our clients, the first decision usually revolves around the type of Customer Facing Display (CFD) required. At SDL, we believe in the philosophy of “One Machine, Multiple Options.” This means our S-Series terminals (S10, S20, S30) are engineered to support both classic text-based displays and modern high-definition screens, depending on your specific business environment.
The Classic VFD (Vacuum Fluorescent Display)
For businesses that prioritize simplicity and speed, the VFD Guest Display remains a reliable workhorse. We often recommend this option for high-volume environments like supermarkets or convenience stores where the primary goal is transaction transparency.
- Functionality: Displays 2 lines of text (usually pricing and a “Thank You” message).
- Visibility: High contrast green or blue characters that are readable in bright lighting.
- Power Efficiency: Draws minimal power from the main terminal.
While it lacks graphical capabilities, the VFD is incredibly robust and cost-effective, focusing strictly on the essential data your customer needs to see.
LCD/LED Secondary Monitors (The Modern Standard)
If your goal is to increase engagement or run promotions, an LCD/LED Secondary Monitor is the superior choice. We offer a range of sizes—specifically 10.1-inch, 12.1-inch, and 15-inch options—to fit different counter spaces.
Moving to a graphical interface unlocks significant potential:
- Multimedia Content: Play video ads or display high-resolution product images.
- Payment Integration: Perfect for displaying dynamic QR codes for mobile payments.
- Digital Signage: Utilize the screen for branding when the POS is idle.
Our 10.1-inch POS Screen is particularly popular for retail setups requiring a compact footprint, while the larger 15-inch models serve as full-fledged advertising boards.
Comparing Durability and Functionality
Durability is non-negotiable in retail hardware. Whether you choose a VFD or an LCD, we house our technology in industrial-grade materials. Our S-Series terminals utilize aluminum alloy bases, which provide the necessary weight and stability to prevent the unit from tipping when a customer interacts with a Touchscreen Customer Display.
| Feature | VFD (Vacuum Fluorescent) | LCD/LED Multimedia Screen |
|---|---|---|
| Primary Use | Price verification, Simple text | Advertising, QR Payments, Order Confirmation |
| Interactivity | None | Optional Touchscreen capabilities |
| Durability | Extremely High (Industrial) | High (Requires stable alloy base) |
| Maintenance | Zero maintenance | Standard screen cleaning required |
We design our POS Hardware Integration to be seamless. The fanless cooling systems in our main units ensure that adding a secondary display does not generate excess heat or noise, maintaining a professional atmosphere at your checkout counter.
Critical Hardware Specifications: How to Choose the Right Model
Selecting the correct specifications for your POS terminal External Secondary Display Guide ensures your system runs smoothly without lag or compatibility headaches. At SDL, we engineer our S-Series terminals to handle dual-screen outputs effortlessly, but understanding the underlying tech helps you make the best decision for your checkout counter.
Connectivity & Ports (The Lifeline)
The connection interface dictates the quality of the image and the ease of installation. When choosing multi-peripheral POS hardware, the interface type is the first thing we check to ensure seamless communication between the main unit and the guest screen.
HDMI vs VGA for POS
While VGA was the standard for years, it is an analog signal that can result in fuzzy text on modern high-resolution screens. HDMI (High-Definition Multimedia Interface) is the digital standard we recommend for most 15-inch or 15.6-inch secondary LCDs. It carries both high-definition video and audio, making it perfect for running promotional videos with sound.
USB Type-C (The One-Cable Solution)
For a cleaner countertop, USB-C POS Monitor setups are becoming the gold standard. A single USB-C cable can transmit data, video, and power simultaneously. This eliminates the “spaghetti wiring” mess often found behind registers. Our modern Intel-based terminals (J4125, J6412, Core i-Series) are designed to support these streamlined connections.
| Interface | Signal Type | Best Use Case | Pros |
|---|---|---|---|
| VGA | Analog | Legacy VFDs, Older Monitors | Widely compatible with old hardware. |
| HDMI | Digital | 15″ Multimedia Screens | Sharp image, carries audio, standard on S-Series. |
| USB-C | Digital + Power | Modern 10.1-inch POS Screen | Single cable, reduces clutter, easy setup. |
Resolution & Brightness Essentials (Nits matter)
A washed-out screen is useless for marketing. For a 10.1-inch POS Screen used for transaction details, a standard resolution (like 1024×600 or 1280×800) is sufficient. However, if you are using a larger 15.6-inch display for digital signage, you need Full HD (1920×1080) to ensure your product images look crisp.
Brightness is measured in nits. Standard office monitors sit around 200 nits, which is often too dim for bright retail environments. We recommend screens with 300+ nits brightness to ensure visibility under strong overhead store lighting or near windows.
Mounting Options: Integrated Pole vs. VESA Compatibility
How you attach the screen affects the stability of the entire system.
- Integrated Mounts: Our S-Series terminals feature aluminum alloy bases designed to support an integrated secondary screen directly on the stand. This provides a unified “All-in-One” look and prevents the screen from wobbling when customers touch it.
- VESA Mounts: For setups where the customer facing display needs to be placed further away or on a separate pole, look for VESA compatibility (usually 75x75mm or 100x100mm). This allows you to mount the monitor on a standard arm or wall bracket.
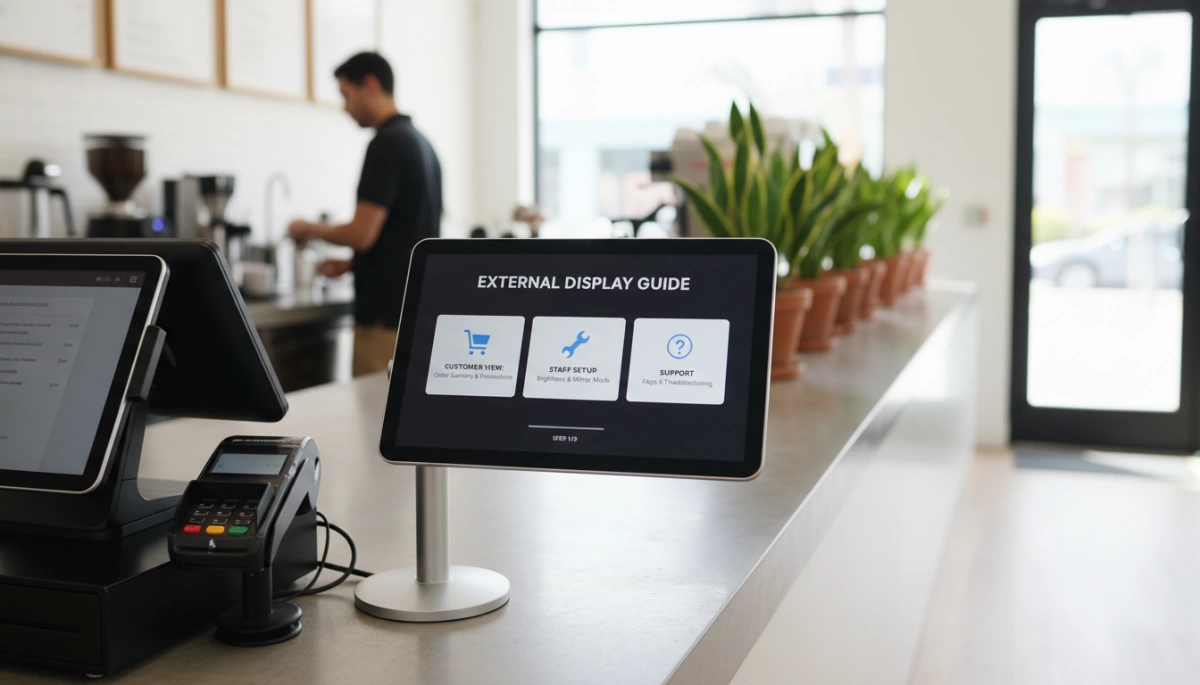
Step-by-Step Installation Guide (Hardware & OS)
Setting up a POS terminal External Secondary Display Guide requires precision to ensure stability and a clean counter appearance. Whether you are attaching a simple VFD or a high-definition 15-inch LCD to our S-Series terminals, the process follows a logical flow from physical connection to software configuration.
Physical Connection and Cable Management
For a professional retail environment, cable clutter is unacceptable. Our S-Series (S10, S20, S30) terminals feature aluminum alloy bases designed with internal cable routing channels.
- Port Selection: Identify the video output on your main terminal. Most industrial units use HDMI or VGA for video, while some integrated 10.1-inch POS Screens utilize a proprietary port or USB-C for a single-cable connection.
- Routing: Feed the video and power cables through the neck of the stand before plugging them in. This prevents accidental disconnections during rotation or touch interactions.
- Mounting: Secure the secondary display to the VESA mount or the dedicated integration slot on the back of the main chassis. Ensure the screws are tight to prevent the “wobble” effect when customers sign on the screen.
Powering Up: USB vs External Power Bricks
Power delivery depends on the size and type of your secondary screen.
- USB Powered: Smaller displays (like VFDs or 10.1-inch LCDs) often draw sufficient power directly from the terminal’s USB port. This reduces the number of outlets needed.
- External Power Bricks: Larger 15-inch customer facing displays usually require a separate 12V power adapter to maintain brightness without draining the main motherboard’s resources. Always use the manufacturer-supplied adapter to prevent voltage irregularities.
OS Configuration (Windows & Android)
Once the hardware is physically secure, the operating system must be told how to handle the new pixel real estate. Proper configuration is a vital step when you decide to modernize your retail checkout system with dual-screen technology.
For Windows POS Terminals:
- Right-click the desktop and select Display Settings.
- Ensure both screens are detected. If not, check your connections.
- Scroll to the “Multiple displays” section.
- Select Extend these displays. Do not select Mirror/Duplicate, as this exposes your backend interface to the customer.
- Adjust the resolution to the native recommendation (e.g., 1920×1080 for 15.6″ screens) to ensure text is crisp.
For Android POS Dual Screen Setups:
- Navigate to Settings > Display.
- Look for “HDMI” or “Dual Screen” settings (labeling varies by Android version).
- Enable the secondary screen output.
- Most Android POS software will automatically detect the second screen and push the “Customer View” (cart totals/ads) to it while keeping the cashier controls on the main screen.
Setting Up Extended Display Mode vs. Mirroring
Choosing the right display mode is critical for POS Hardware Integration.
- Mirroring (Duplicate): Shows the exact same content on both screens. This is rarely used in retail because you do not want customers seeing admin menus or sensitive transaction data.
- Extended Display Mode: This treats the secondary monitor as a separate workspace. Your POS software sends specific media—like digital signage, itemized receipts, or QR codes—to the guest screen while the cashier works uninterrupted on the primary monitor. This separation is essential for maximizing the utility of a multimedia guest screen.
Maximizing ROI: Content Strategies for Your Secondary Display
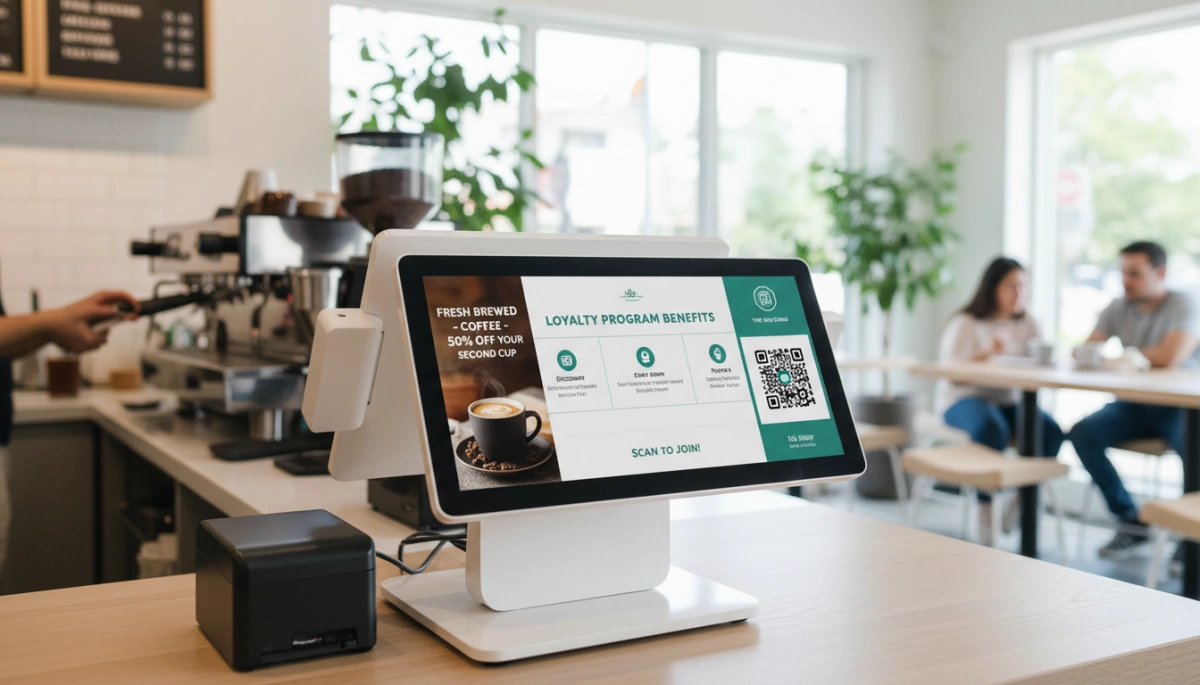
A POS terminal External Secondary Display isn’t just for showing prices; it is prime real estate for increasing revenue. If that screen is blank between transactions, you are leaving money on the table. We need to turn that hardware into a marketing machine.
Idle Time Marketing and Retail Digital Signage
When the checkout line is empty or a cashier is scanning items, your Customer Facing Display (CFD) should be working hard. Treat this space as dedicated Retail Digital Signage. Instead of a static logo, run a slideshow of high-margin items or upcoming promotions.
- Promote Bestsellers: Show mouth-watering images of add-ons (like that extra shot of espresso).
- Event Advertising: Announce upcoming sales or holiday hours.
- QR Codes: Display a static QR code for customers to scan and follow your social media.
Interactive Features: Signatures and Tipping
In the US market, speed and convenience are king. An Interactive Guest Screen transforms the checkout flow. By using a Touchscreen Customer Display, you eliminate the need for printed receipts and separate credit card terminal interactions for signatures.
Crucially, on-screen tipping prompts significantly boost staff earnings. When customers see preset tip percentages on a clear, bright Dual Screen POS System, they are more likely to tip than with a traditional jar.
Loyalty Program Integration via Touchscreen
Data is the new currency. Don’t ask staff to awkwardly ask for email addresses. Let the customer do it. A Touchscreen Customer Display allows shoppers to enter their own phone number or email for loyalty points while the cashier bags items. This reduces errors and speeds up the line.
Configuring these specific software triggers often requires checking your software’s integration guide to ensure the secondary monitor triggers the right pop-ups at the right time.
Quick Content Strategy Guide:
| Display Mode | Content Idea | Primary Benefit |
|---|---|---|
| Idle Mode | Video loops of new products | Increases impulse buys |
| Transaction | Itemized list + Upsell suggestions | Builds trust & ticket size |
| Payment | Digital Signature & Tipping | Faster checkout & happier staff |
| Post-Sale | Loyalty signup form | Customer retention |
Troubleshooting Common Secondary Display Issues
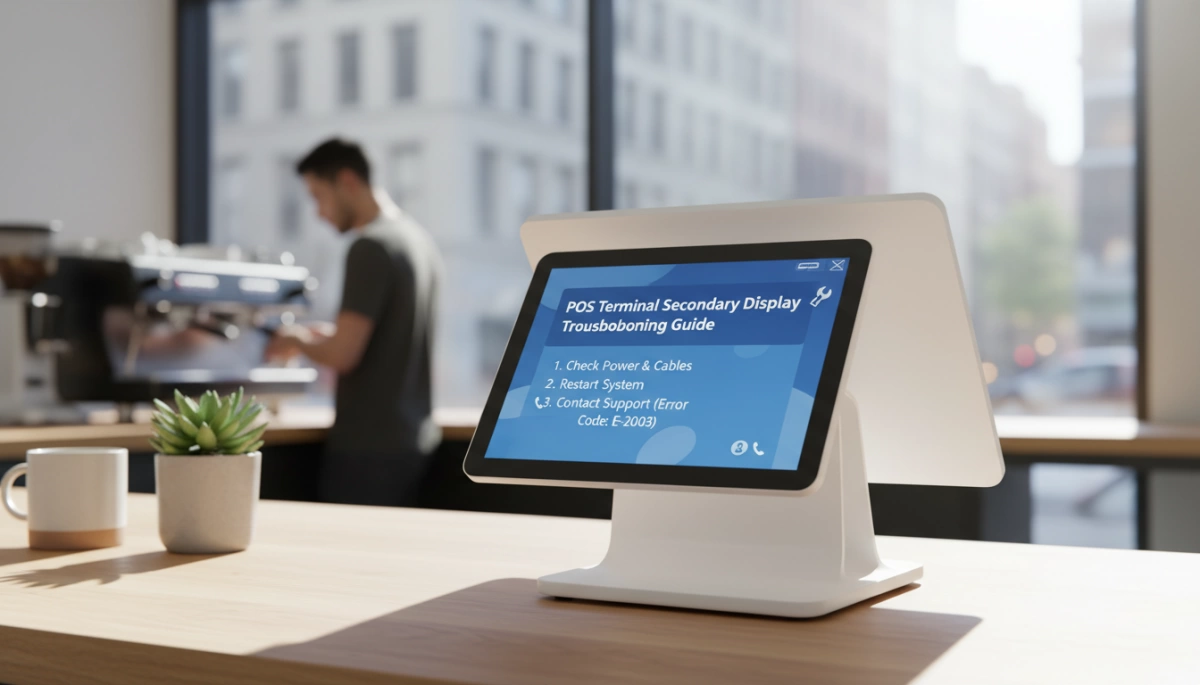
Even with industrial-grade hardware like our S-Series, configuration hiccups can happen during the initial setup of a Dual Screen POS System. Most issues aren’t hardware failures but rather simple software or connection misalignments that are easy to fix.
Fixing “No Signal” and Connection Errors
If your Customer Facing Display (CFD) shows a “No Signal” message, the culprit is usually a loose connection or an incorrect input source. Our terminals often feature hidden cable management within the aluminum alloy base to keep counters clean, but this sometimes means a cable isn’t fully seated.
- Check Physical Ports: Ensure the HDMI, VGA, or USB-C cable is firmly plugged into both the main terminal and the secondary monitor.
- Verify Input Source: On the secondary monitor menu, confirm it is set to the correct input (e.g., HDMI 1 vs. HDMI 2).
- Driver Updates: For USB-driven displays, ensure the specific display link drivers are installed, especially if you are customizing a POS Secondary Monitor Setup on Windows.
Calibrating Touch Inaccuracy on Guest Screens
For retailers using an Interactive Guest Screen to capture signatures or loyalty info, touch accuracy is non-negotiable. If a customer taps “Yes” but the system registers “No,” you need to recalibrate.
- Windows Calibration: Go to Control Panel > Tablet PC Settings > Calibrate.
- Identify the Screen: Windows will ask you to tap the specific screen you want to calibrate. Make sure you are tapping the Touchscreen Customer Display, not the main cashier screen.
- Save Data: Once the crosshairs are tapped in all corners, save the calibration data to lock in the precision.
Resolving Black Screen and Power Saving Conflicts
A common frustration is the secondary screen going black while the main POS is still active. This is typically a power-saving setting in the OS, not a hardware defect. Whether you are running an Android POS Dual Screen setup or a Windows environment, the system often treats the second screen as an external monitor that can sleep independently.
- Adjust Power Plans: Set “Turn off display” to “Never” for the secondary screen in your OS power settings.
- USB Power Delivery: If you are using a USB-powered 10.1-inch screen, ensure the USB port on the main terminal supplies sufficient voltage. Our POS hardware configurations are designed with powered ports specifically to handle these peripherals without external bricks.
- Extended Mode Check: Ensure your display settings are set to “Extend these displays” rather than “Show only on 1,” which effectively disables the guest screen.
Why Choose SDLPOS for Your Dual-Screen Hardware?
At SDL, we approach POS Hardware Integration with a manufacturer’s precision. We understand that adding a secondary screen isn’t just an accessory upgrade—it is a critical touchpoint for customer engagement. Our S-Series terminals are engineered to support robust dual-display configurations without compromising stability or speed.
Factory Direct Customization (OEM/ODM)
We operate on a “One Machine, Multiple Options” philosophy. Because we control the manufacturing process, we offer extensive OEM/ODM flexibility that resellers and software vendors need. Whether your deployment requires a simple VFD for price transparency or a high-definition 10.1-inch POS Screen for running video promotions, we configure the hardware to match your specific operational flow.
Industrial Grade Durability for Retail
Stability is non-negotiable when customers are interacting with your hardware. Our terminals feature heavy-duty aluminum alloy bases that prevent wobbling when a guest taps on a Touchscreen Customer Display. Combined with our fanless cooling systems, our hardware withstands the dust and grease common in hospitality environments while maintaining silent operation.
Seamless Integration with Intel Processors
Driving two independent displays requires reliable processing power. We equip our terminals with high-performance Intel chips—specifically the J4125, J6412, and Core i3/i5 series—to ensure your Customer Facing Display (CFD) runs rich media content without causing lag on the cashier’s primary screen.
SDL Hardware Performance Matrix:
| Feature | Standard Configuration | High-Performance Setup | Benefit |
|---|---|---|---|
| Processor | Intel J4125 / J6412 | Intel Core i3 / i5 | Lag-free multitasking for dual screens. |
| Secondary Display | VFD / 10.1″ LCD | 12.1″ / 15″ LCD | Flexible options for text or video marketing. |
| Cooling | Fanless Passive | Fanless Passive | Silent operation and reduced dust intake. |
| OS Support | Windows / Android | Windows / Android | Compatible with your preferred software. |
Choosing the right hardware foundation ensures you maximize the benefits of dual-screen POS machines effectively, turning a simple transaction point into a powerful marketing tool.
Frequently Asked Questions About POS Secondary Displays
Can I add a secondary display to any POS terminal?
Not every terminal is built for a Dual Screen POS System. While many legacy systems have a VGA port, they often lack the processing power to drive two screens smoothly. To run a high-definition POS Secondary Monitor Setup effectively, your main unit needs a capable processor—like the Intel J4125, J6412, or Core i5 found in our S-Series hardware. Without sufficient CPU power and RAM, adding a second screen can cause the entire checkout process to lag. Additionally, check your I/O panel; you need a dedicated HDMI, VGA, or specialized proprietary port available on the motherboard.
Do I need special drivers for a customer facing display?
For a standard LCD or 10.1-inch POS Screen, the setup is usually “Plug and Play.” Modern operating systems like Windows 10/11 automatically detect the monitor via HDMI or VGA without requiring extra software. However, if you are using a USB-driven monitor or a classic VFD Guest Display, you will likely need to install specific drivers to emulate a COM port. This ensures the POS software sends the correct text data to the line display. For complex setups involving multimedia, ensuring you have the right cash register systems for restaurants and cafes allows for seamless driver integration for digital menu boards.
What is the difference between a pole display and a rear mount?
The main difference lies in visibility and form factor. A POS Pole Display stands independently on a metal tube, allowing you to adjust the height and rotation angle so the customer can see it over a high counter. This is common for simple 2-line VFDs. A rear mount, conversely, attaches directly to the back of the main terminal using a VESA mount or integrated bracket. This creates a sleek, all-in-one look ideal for modern retail. When selecting POS hardware for hardware and DIY stores, we often recommend rear-mounted LCDs to keep the counter space clear for heavy items.
How do I change the logo or image on my secondary screen?
Changing the content on your Customer Facing Display (CFD) depends on your configuration mode.
- Extended Display Mode: If configured as a second monitor in Windows, you can simply set a branded wallpaper as the background image.
- POS Software Control: Most professional POS software has a specific “Second Screen” tab where you can upload logos, rotating banner ads, or video files.
- VFD Settings: For text-only displays, you typically use a utility tool provided by the manufacturer to program a “Welcome” or “Goodbye” message that scrolls when the register is idle.


